
Time for my backup soapbox. The proper Lightroom backup strategy is critical. How many of your irreplaceable images can you afford to lose? Hard drives will fail. That is fact. And if Murphy is right (he usually is), it will fail when you don’t have a backup and you’re in need of your most important images. Regrettably, most of us don’t become true believers until this happens. Yes, I speak from experience.
There are two components of a Lightroom backup strategy: the Lightroom catalog, and the high resolution image files. These are usually (should be) in different locations and should be backed up in different ways for maximum efficiency and protection.
Lightroom Catalog
This is where all the magic resides. The Lightroom catalog contains all the information about any image editing, cropping, toning, touchup, metadata, etc. Without it, you’ve got just a bunch of raw camera image files (and a LOT of work to redo if you ever lose your catalog!).
In Lightroom, go to “Edit > Catalog Preferences.” In the “General” tab’s “Backup” section, you’ll see the “Back up catalog” option. Select, “Every time Lightroom exits”. Click on the OK button to save your preferences.
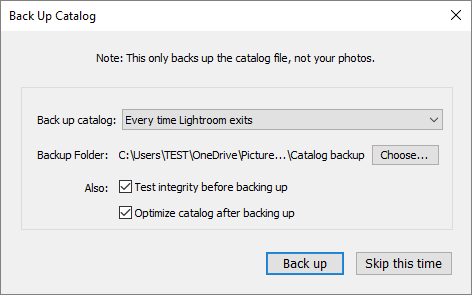
Exit Lightroom and the Backup dialog box will appear. Here, you’ll be able to select where the catalog will be backed up. Choose a different disc drive, preferably one that is part of a cloud sync or backup service such as OneDrive, DropBox or Carbonite. That way your Lightroom catalog backup is backed up to the cloud (offsite) regularly.
You should check the option, “Test integrity before backing up” to ensure that you are backing up a catalog that not corrupt. And you should check, “Optimize catalog after backing up” which cleans up and reorganizes your database to make it run faster.
Image Files
Your Lightroom catalog isn’t much good without the high-resolution image files. Image files should be backed up separately and regularly to a different disc drive and/or cloud backup service (preferably both). I use an external disc drive for backups as well as Carbonite for automatic backups to the cloud. (Yes, I’m anal. One tends to get that way after you’ve lost some of your valuable images. And, any photographer who tells you they’ve never lost an image on their computer is lying.)
There are several backup services available. Be sure to select the service that offers sufficient storage space, reliability, and customer service to meet your needs. For example, if you use a cloud backup service and ever need to recover all your image files (due to catastrophic failure), it could easily take days – or even weeks – depending on the number and size of files and speed of your internet connection. With Carbonite, I have an purchased add-on service that allows me to get my files sent to me on a hard drive (rather than restoring via internet) in the event that a tornado picks up my computer and backup drives and disperses them somewhere in Kansas.
To simplify backups (so that you’ll actually do them), I’d highly suggest a backup application that supports differential backups.
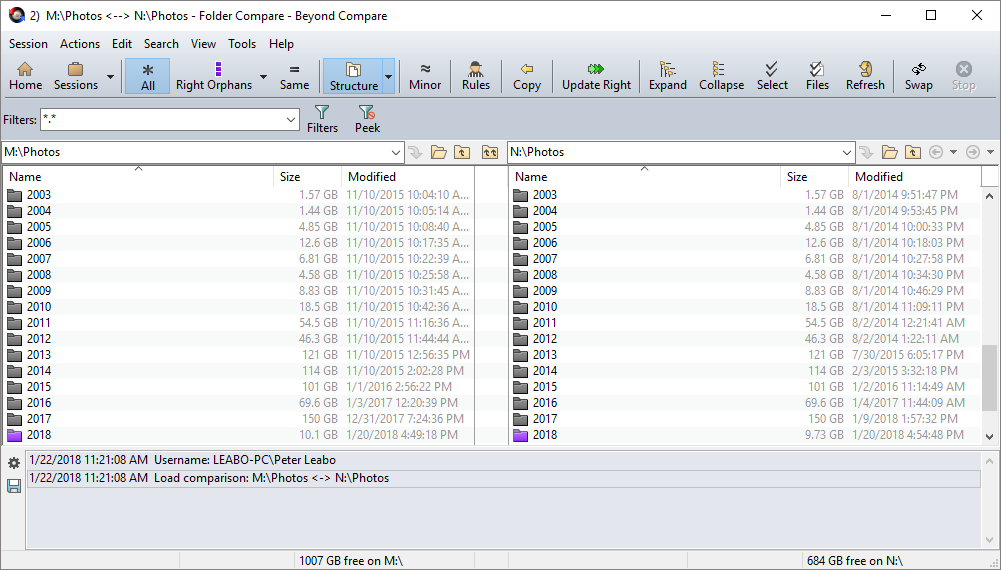
Even simpler, there are several folder compare applications available (such as Beyond Compare by Scooter Software) that compare two folder structures on two different drives and let you copy only the new/changed files to sync the two. This is a very simple way to back up your images after every time you do an import. The process takes only a couple of minutes to synchronize my master image collection with a backup of the collection on a portable USB drive.
Remember, when your hard drive fails (it will), or you accidentally delete a folder of your best images (you will), a successful Lightroom backup will save you.
If you’re just getting started with Lightroom, please refer to my article on Lightroom Organization Strategy. And, if you didn’t catch that article, you may wish to refer to Fixing a Broken Lightroom Structure.