I’m often asked, “what is the best camera?” Well, simply put, it’s the one that you have with you at ready when a picture happens in front of you.
Not to be flippant, but there are so many cameras on the market with such incredible features, resolution, and quality, that what often makes the difference in getting “that” picture is not which camera, but rather simply having a camera and having it ready.
Here are three suggestions (from experience!) that will help.
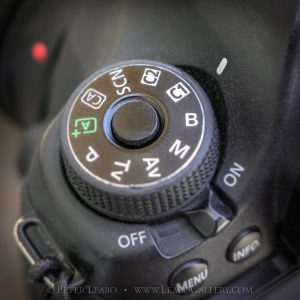
First, when you return from a shoot, be sure to reset any custom or assignment-specific settings back to automatic or neutral (e.g., white balance, shutter mode, exposure compensation, ISO, metering mode, etc.). Then set your camera mode back to the “P” automatic mode. Granted, it may not be the ideal setting, but you will get a picture. There’s nothing worse than grabbing your camera to catch “that” picture and clicking the shutter only to have no autofocus, a two-second delay, mirror locked up, and a 20-second exposure because your camera was last set for shooting the skyline at night.
Second, consider using one of the user-defined Custom modes in your camera to store all those neutral/automatic settings with your camera in the “P” automatic mode. Then, regardless of whatever shooting situation you’re currently in (portrait with custom color balance, or long-exposure night skylines, etc.), when something unexpected happens you can quickly switch the mode to C1 (or wherever you’ve stored those settings) and shoot without having to take time to reset half a dozen different settings.
Third, there’s nothing worse than picking up your camera for that split-second shot and capturing an incredible close-up of the back side of your lens cap! Lose it! A high-quality UV filter does an equally good job protecting your lens and is much easier to shoot through.
Many of us have not adopted a regimented approach to organizational structure (described in my article, “Lightroom Organization Strategy”) and may have images scattered across folders and hard drives in a variety of structures and naming conventions — or lack thereof.
Use Adobe Lightroom Classic CC’s import function and file renaming templates to move those images into a standardized folder structure and naming convention (please read the previously mentioned article). With a combination of effective file naming and keywording, you can then use Lightroom’s powerful search tools to easily locate any image in the future. It’s much easier than using brute force to plow through folders all over your computer!
Take time. Do it right.
Note that this process will likely take time – especially to do it effectively. Your photos may be re-imported (moved) in any order. With the process described in “Lightroom Organizational Strategy,” Lightroom parses the image capture date automatically and uses it to determine the destination directory, subdirectory, and filename of the imported images. A methodical, regimented approach is the key to success.
To begin, make sure there is no camera or card reader attached to your computer. In Lightroom’s Library mode, click on the [Import] button (lower right), or select, “File > Import Photos and Videos.”
In the left pane of the import dialog window, select the source folder of images you wish to import. Once that is selected, you will be presented with thumbnails of images to make your selections.
The process is the same as importing from a camera/card. You may wish to select “Move” (instead of “Copy”) if you already have your original images backed up somewhere. Otherwise, select “Copy” and then delete the original mess after you have re-imported images into Lightroom (and backed them up!). Do not select “Add” (as that leaves your photos exactly where are – in the same mess that you already have).
Back it up!
Be sure to back up your Lightroom catalog and your high resolution image files regularly as you go through this process. Refer to my article, “Lightroom Backup Strategy,” for best practices for backups.
Time for my backup soapbox. The proper Lightroom backup strategy is critical. How many of your irreplaceable images can you afford to lose? Hard drives will fail. That is fact. And if Murphy is right (he usually is), it will fail when you don’t have a backup and you’re in need of your most important images. Regrettably, most of us don’t become true believers until this happens. Yes, I speak from experience.
There are two components of a Lightroom backup strategy: the Lightroom catalog, and the high resolution image files. These are usually (should be) in different locations and should be backed up in different ways for maximum efficiency and protection.
Lightroom Catalog
This is where all the magic resides. The Lightroom catalog contains all the information about any image editing, cropping, toning, touchup, metadata, etc. Without it, you’ve got just a bunch of raw camera image files (and a LOT of work to redo if you ever lose your catalog!).
In Lightroom, go to “Edit > Catalog Preferences.” In the “General” tab’s “Backup” section, you’ll see the “Back up catalog” option. Select, “Every time Lightroom exits”. Click on the OK button to save your preferences.
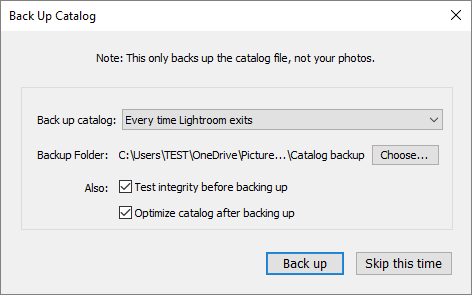
Select the location of your Lightroom catalog backup, as well as other options, in the Back Up Catalog dialog window that appears when Lightroom closes.
Exit Lightroom and the Backup dialog box will appear. Here, you’ll be able to select where the catalog will be backed up. Choose a different disc drive, preferably one that is part of a cloud sync or backup service such as OneDrive, DropBox or Carbonite. That way your Lightroom catalog backup is backed up to the cloud (offsite) regularly.
You should check the option, “Test integrity before backing up” to ensure that you are backing up a catalog that not corrupt. And you should check, “Optimize catalog after backing up” which cleans up and reorganizes your database to make it run faster.
Image Files
Your Lightroom catalog isn’t much good without the high-resolution image files. Image files should be backed up separately and regularly to a different disc drive and/or cloud backup service (preferably both). I use an external disc drive for backups as well as Carbonite for automatic backups to the cloud. (Yes, I’m anal. One tends to get that way after you’ve lost some of your valuable images. And, any photographer who tells you they’ve never lost an image on their computer is lying.)
There are several backup services available. Be sure to select the service that offers sufficient storage space, reliability, and customer service to meet your needs. For example, if you use a cloud backup service and ever need to recover all your image files (due to catastrophic failure), it could easily take days – or even weeks – depending on the number and size of files and speed of your internet connection. With Carbonite, I have an purchased add-on service that allows me to get my files sent to me on a hard drive (rather than restoring via internet) in the event that a tornado picks up my computer and backup drives and disperses them somewhere in Kansas.
To simplify backups (so that you’ll actually do them), I’d highly suggest a backup application that supports differential backups.
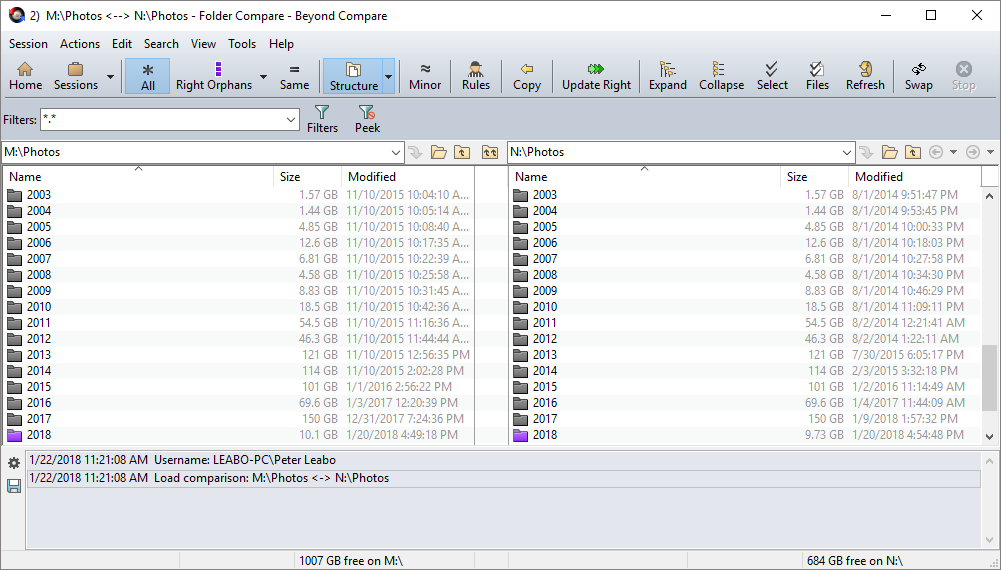
Use a file/folder compare utility, such as Beyond Compare, to do fast and easy differential backups of your image files after every import or Lightroom session.
Even simpler, there are several folder compare applications available (such as Beyond Compare by Scooter Software) that compare two folder structures on two different drives and let you copy only the new/changed files to sync the two. This is a very simple way to back up your images after every time you do an import. The process takes only a couple of minutes to synchronize my master image collection with a backup of the collection on a portable USB drive.
Remember, when your hard drive fails (it will), or you accidentally delete a folder of your best images (you will), a successful Lightroom backup will save you.
The key to success in your photographic workflow and image collection management with Adobe Lightroom Classic CC is the initial Lightroom organization. Adopt a standard, logical organizational and import strategy and stick to it. You can then use Lightroom’s powerful search tools to quickly locate the images you need. Let Lightroom do your work. It will become the core of your image management and post-production workflow. The organizational strategy described here is considered best practice among pros, although you’ll see some minor variances for personal preferences or unique image workflow requirements.
Two things are key to successful image management and workflow: Start with the right organizational strategy; shoot camera raw format … and nothing but RAW! There’s only one good reason to ever capture in JPEG, and that’s if you must deliver a product directly from your camera without bringing it into any cataloging/editing application on a computer. In that case, shoot RAW+JPEG (and give the JPEG to your client and keep the RAW for your own purposes). If that’s not the case, shoot RAW! It gives you vastly more flexibility in image editing. I’ll get off the RAW soap box now, but look for more on RAW vs JPEG in another article.
There are two major components in Lightroom organization: the location of the Lightroom catalog, and the folder/filename organization of the high resolution image files.
Lightroom Catalog Location
Most experts agree that for optimum performance, reliability, and stability, your Lightroom catalog file should be in a folder on your local hard drive that is not part of cloud sync or backup service, such as OneDrive, DropBox, or Carbonite. Your Lightroom catalog file is being updated constantly and it gets quite large. If, for example, the catalog is in a OneDrive folder, OneDrive will be constantly uploading it and it will restart with every edit. You should make sure, however, that your catalog is backed up daily and that the backup location is in folder that is part of a cloud sync or backup service. See the article on Lightroom Backup Strategy for additional details.
Image Files Organization
To set up your import preferences initially, plug in your camera or a card reader with your camera card. If the Import dialog window doesn’t launch automatically, click the Import button in the lower left of the left pane or go to, “File > Import Photos and Video.”
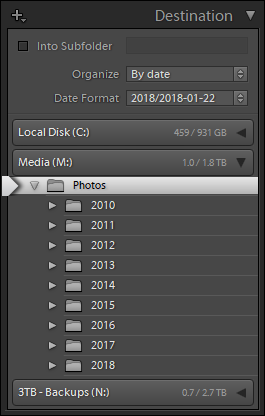
In the right pane of Lightroom’s Import dialog window, expand the “Destination” section. Select a drive for your image collection. I use a separate 2TB drive dedicated to my photos. Pros: it’s highly portable and easily backed up, and as a dedicated data-only drive, it’s less susceptible to corruption, viruses, malware, etc., that may affect a drive with your OS and applications. Cons: it’s usually not automatically part of a OneDrive (or similar) cloud replication strategy and you’ll need to set that up separately. The drive containing your image files doesn’t need to be very fast as Lightroom does not do frequent read/write operations with the image files.
Select the parent folder for your high-resolution images in the Destination section of Lightroom’s Import dialog window.
After you’ve selected a drive, choose a top-level folder for your image collection. On mine, it’s a folder on the root of my M: (Media) drive, cleverly named, “Photos.” Now the magic begins.
In the “Organize” field, you should select “By date,” and for “Date Format” you should select, “2018/2018-01-22” (note that it will display the current date). Do not check “Into Subfolder” as the specified Date Format will automatically create subfolders based on the image capture date(s).
Whenever you import digital images with these settings, they will be automatically organized by creation date into subfolders of your top-level folder, first by YYYY and then by YYYY-MM-DD inside the YYYY folder.
You can rename the lowest-level folders to something logical like “2018-01-19 eagles on river” later in Lightroom. You can even create subfolders of those creation date folders for different takes or from the same day for more granular organization of your images if you’d like.
For those who might ask, “why not organize my photos by subject?” I have a simple answer: Don’t. Subjects are subjective. Dates are not. And, photos often may be associated with more than one subject so trying to organize by subject usually results in organizational chaos. Instead, organize physically by date and use Lightroom’s powerful keywording and collections functions to create virtual collections (virtual organization) of images by subject(s) that transcend dates.
Renaming Image Files on Import
The next part of the organization magic is automatically renaming the cryptic, camera-assigned file names on import. Using Lightroom’s powerful and flexible filename templates, it can automatically change that useless file name, “IMG_0429.CR2,” to something more meaningful such as, “20170126-173028 Erica Leabo senior portrait.CR2.”
Create a Custom Renaming Template
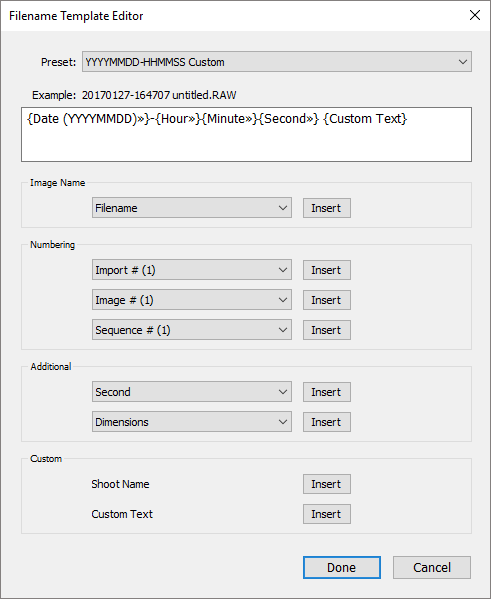
Use Lightroom’s Filename Template Editor to create a custom template for renaming high-resolution image files on import or later in Lightroom’s Library mode.
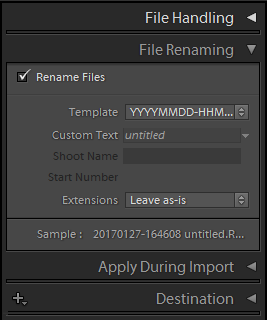
In the import options pane on the right, expand the “File Renaming” section. Check the box for “Rename Files.” For “Template” choose, “Custom Settings” and that should spawn a File Template Editor window where you will build a custom renaming template. The template I like (because it makes sense for knowledge and organizational reasons) renames the file based on the file creation date and time, and custom text such as the assignment, client, or subject of the photos. A benefit to this renaming scheme is that if you ever were to lose your Lightroom catalog, you can still easily locate images using a logical search (in the operating system) for the date or custom text in the file name.
Make sure the template field is blank. In the “Additional” section, click on the pulldown for top field. Select, “Date YYYYMMDD.” If that isn’t automatically inserted into the template field (you should see: {Date (YYYYMMDD)»}), click the Insert button. Type a hyphen (-) directly into the template field after the date formula. Then click on the pulldown in the same field where you got the first formula and select, “Hour.” Repeat the process with “Minute” and “Second.” Type a space into the template field after the date and time formulas. Then, in the “Custom” section, click on the Insert button to the right of “Custom Text”. Your template field formula should look like this:
In the “Preset:” field, choose the pulldown and select, “Save Current Settings as New Preset.” Give it a name like you see above or whatever makes sense for you. (Note that you can easily rename photos later in Lightroom using this same template.)
Ready … Set … Import!
Collapse all the import options sections except for the “File Renaming” section (so you don’t accidentally change those options).
Select your custom template and enter custom text in the File Renaming dialog options before importing photos.
When you’re ready to import, select the image(s) you wish to import by checking the box in the upper left corner of the thumbnail(s).
In the File Renaming section, make sure that “Rename Files” is checked and that your custom template is selected in the “Template” field. Then type a descriptor of the images (e.g., client name, subject name, assignment description, etc.) into the “Custom Text” field. Make sure “Copy” is highlighted at the top of the import dialog screen (“Copy” is the default. This allows you to keep the original images on your camera/card until you have ensured that they are in Lightroom … and backed up!). Click on the [Import] button at the bottom of the screen and Lightroom will import your photos, creating folders by date as needed and renaming the image files.
If you have not set your camera to embed your copyright information into your image files, I’d suggest using the “Apply During Import” section’s “Metadata” function to append your copyright metadata. See Lightroom’s help files for information on creating a metadata preset for your copyright information.

 Second, consider using one of the user-defined Custom modes in your camera to store all those neutral/automatic settings with your camera in the “P” automatic mode. Then, regardless of whatever shooting situation you’re currently in (portrait with custom color balance, or long-exposure night skylines, etc.), when something unexpected happens you can quickly switch the mode to C1 (or wherever you’ve stored those settings) and shoot without having to take time to reset half a dozen different settings.